A very important step is to configure Visual Studio for the development purpose. A properly configured IDE can enhance your development skills avoiding any time consuming prospects.
After you have downloaded the VM from Life Cycle Services :-
1) Mount the VM on either HyperV or VirtualBox whichever suits your requirement.
2) Login into the machine by using the standard password :- pass@word1
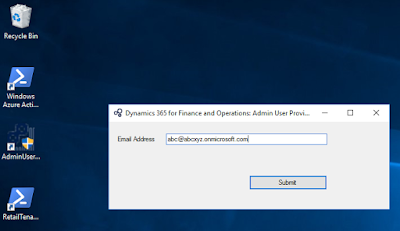
3) On the desktop you will find an icon of Admin Provisioning Tool such as below :-
4) Open this tool and enter your Office 365 subscription address and click Submit :-

5) Once done go to All Programs-->Visual Studio 2015-->Right click-->Run as Administrator
6) Once Visual Studio opens go to Dynamics 365 Menu and select Options then select Dynamics 365 Category
7) As we can see that as per the standards of Microsoft Best Practice all the options are already enabled
8) Now only we have enable some options for the smooth and well categorized functioning of our future projects. So under Dynamics 365 section go to Projects subcategory.
9) As you can see that we have selected the first and last option its not necessary to select these options before starting your development but if we do it will make our job whole lot easier and organized and selecting the Synchronize database on build for newly created project will help us to avoid extra efforts for Full Database Synchronization every time we create any Data Dictionary Object such as Extended Data Types or Tables.
10) That's it now we are ready to get started with Dynamics 365 Finance and Operations customizations.
After you have downloaded the VM from Life Cycle Services :-
1) Mount the VM on either HyperV or VirtualBox whichever suits your requirement.
2) Login into the machine by using the standard password :- pass@word1
3) On the desktop you will find an icon of Admin Provisioning Tool such as below :-

5) Once done go to All Programs-->Visual Studio 2015-->Right click-->Run as Administrator
6) Once Visual Studio opens go to Dynamics 365 Menu and select Options then select Dynamics 365 Category
7) As we can see that as per the standards of Microsoft Best Practice all the options are already enabled
8) Now only we have enable some options for the smooth and well categorized functioning of our future projects. So under Dynamics 365 section go to Projects subcategory.
9) As you can see that we have selected the first and last option its not necessary to select these options before starting your development but if we do it will make our job whole lot easier and organized and selecting the Synchronize database on build for newly created project will help us to avoid extra efforts for Full Database Synchronization every time we create any Data Dictionary Object such as Extended Data Types or Tables.
10) That's it now we are ready to get started with Dynamics 365 Finance and Operations customizations.


No comments:
Post a Comment